




20ft Construction Site Prefab House: Temporary Offices and Welfare Units
2026-11-18 01:29:29
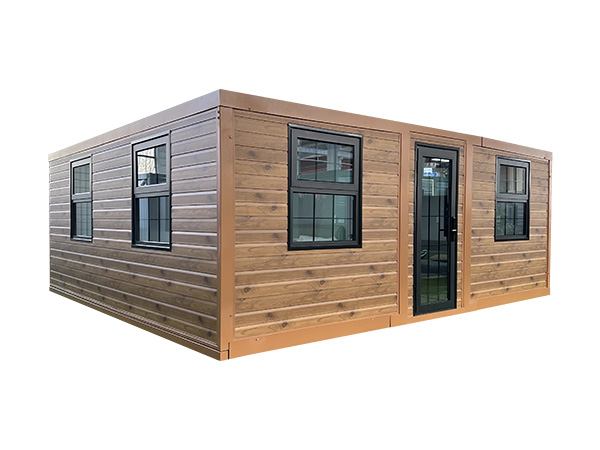
At first light on a working site, the compound is already awake: a telehandler reverses toward the gate, a manager checks the welfare board, and a flat-bed truck arrives with one finished module. By lunchtime that single 20ft construction site prefab house has been lifted onto four padstones, plugged into a temporary supply and opened as an office, while a second unit nearby is fitted as a canteen. This guide follows the journey from first sketch to the day the unit lifts away.
Stage One — Planning the Site Compound
Every good installation is decided before the truck leaves the factory. The first stage is a compound plan fixing where the unit stands, how it arrives and where its services come from. Live sites squeeze those choices.
This is also where the temporary-building classification is settled. Most sites treat a single transportable unit as a temporary structure, which changes the approval route, the fire strategy and the insulation standard. Confirming that early avoids a costly redesign.
Fix the position — Mark the pad on the drawing, leaving clear access for the truck and crane outriggers.
Check the ground — Confirm the sub-base carries the unit and the lift; weak ground needs hardcore or mats.
Reserve the services — Identify the nearest power, water and drain points and agree who connects them.
Set the timeline — Record the delivery date, expected duration and the next destination for reuse.
Stage Two — Choosing the Unit Configuration
A 20ft module is a structural shell; its value comes from the fit-out. Most buyers choose an office-led, welfare or combined layout, and that decision fixes the door, windows, cable drops and plumbing before production. Changing a layout later is expensive.
Office-Led Units
An office configuration sets desks along the glazed wall, with recessed cable trunking, a whiteboard on the end wall and a glazed door that gives the compound a professional address. Acoustic lining keeps calls from carrying, and a small meeting table fits at one end.
Welfare and Accommodation Units
A welfare fit-out turns the same shell into a mess room, a drying room, toilets and showers. The layout concentrates plumbing on one service wall, uses easy-clean finishes and adds a water heater and extract ventilation. Where crews sleep over, berths and lockers replace the canteen tables.
| Configuration | Typical fit-out | Occupancy | Best for |
|---|---|---|---|
| Office-led | Desks, whiteboard, glazed door | Four to six staff | Site management and meetings |
| Welfare | Mess tables, seating, water heater | Six to ten at a time | Breaks, canteen and drying room |
| Accommodation | Berths, lockers, climate control | Two to four sleeping | Remote or overnight crews |
| Combined | Desks one end, welfare the other | Mixed use | Small compounds short on space |
Stage Three — Specifying Size, Structure and Services
The specification sheet is where a 20ft construction site prefab house earns its reputation. Look beyond the headline dimensions to the insulation build-up, the floor loading and the way services enter the unit, because these decide comfort and durability.
| Specification | Typical value | Why it matters |
|---|---|---|
| External footprint | 6.06 x 2.44 m | Road-transportable at container width |
| Internal floor area | 13 to 15 sq m | Room for desks, mess seating or berths |
| External height | 2.85 to 2.95 m | Flat top keeps the transport height low |
| Internal clear height | 2.48 to 2.60 m | Comfortable for standing work and lockers |
| Wall build-up | 50 to 75 mm insulated panel | Sets thermal and acoustic performance |
| Floor loading | 250 to 350 kg per sq m | Supports desks, cupboards and water tanks |
| Tare weight | 2,100 to 2,600 kg | Determines crane size and freight cost |
Power — Specify a board sized for lighting, air conditioning, water heating and sockets, with a labelled isolator.
Water — An insulated feed, a trapped drain and frost protection keep welfare plumbing working through winter.
Drainage — A grey-water tank or a link to the site drain needs a correct fall and a maintenance point.
Climate — A split air-conditioner needs its outdoor position drawn in before the panels are cut.
Stage Four — Delivering to a Live Site
A 20ft unit travels at road width and arrives as one finished module, but placing it on a working site still needs a planned lift. The main risks are access, ground bearing and timing: the truck must reach a position where the crane can set the unit down.
Stage Five — Setting Up Offices and Welfare
Once the module is on its pad, the fit-out turns it into a usable space. On a combined unit the office end and the welfare end are planned as two zones sharing a service wall, so plumbing and cabling stay together and both areas are commissioned in one visit.
The Office Half
Set the desks first, then run power and data to them; this avoids trailing leads across a walkway that sees boots all day. A wall board, a lockable cupboard and a first-aid point complete a practical office. Signage on the flat fascia makes the unit easy to find.
The Welfare Half
The welfare area works hardest at the start and end of a shift. A seating run, a water heater, a kettle point and a drying space for wet clothing are the basics. Where the programme allows, add showers and a separate toilet.
Mess seating — Allow one seat per four to six workers at peak break time, with tables that wipe clean quickly.
Drying space — A heated rail or ventilated locker zone for wet jackets and boots cuts downtime after rain.
Hot water — Size the heater for consecutive shifts and protect exposed pipes against freezing.
Ventilation — Extract fans in the wet areas stop condensation settling in the panels and on the windows.
- ✓ All support points bearing evenly and the unit level in both directions
- ✓ Incoming power isolated at the board and every circuit tested and labelled
- ✓ Water fed, traps primed and drainage falling away with no visible leaks
- ✓ Doors, windows and locks operating smoothly with keys accounted for
- ✓ Heating, cooling and extract ventilation run through a full cycle
Stage Six — Running the Unit Through the Project
A site module is used harder than a domestic room: muddy boots, long hours, shifting teams and equipment that arrives and leaves with the programme. Treating it as managed equipment rather than a fixed building keeps it comfortable and protects its resale value.
Daily housekeeping — A short cleaning routine and a boot-scraper at the door keep grit out of floor joints and drains.
Service checks — Inspect the board, heater and extract fans weekly; a blocked filter is the main cause of poor air.
Condensation control — Ventilate cooking and drying areas and wipe window moisture before it stains panel edges.
Security — Lock the unit at night and keep the meter box and external plant tamper-proof.
Routine attention matters for the people using the space. Reliable heating, working extract ventilation and a dry floor do more for morale on a wet project than extra floor area.
Stage Seven — Demobilisation and Reuse
The last stage justifies the whole approach. At the end of the project the unit is isolated, cleaned and lifted back onto transport, leaving no permanent foundation behind. A module that has been looked after can be refurbished lightly and sent to the next compound.
Isolate services — Disconnect power, water and drainage at the labelled points and cap the ends against dirt and frost.
Clear and clean — Remove loose fit-out, deep-clean the welfare areas and inspect the floor and panel edges.
Lift and load — Lift by the certified points, secure the unit on transport and protect doors and glazing.
Refurbish and redeploy — Replace worn finishes, retest the services and issue the unit to its next site with a condition record.
Planned reuse separates a temporary building from a disposable one. If the next project is known, the unit can be specified with finishes that suit both sites, avoiding a strip-out. That is the practical reason to buy rather than rent.
Seven Stages, One Working Asset
A 20ft construction site prefab house is less a construction project than a logistics exercise in seven stages. Plan the compound, choose a configuration that fits the crew, specify the services, plan the lift, and run and demobilise the unit with the next project in mind. Follow that sequence and one module can serve as an office, a canteen and a welfare unit across several jobs.